2012/06/29

裏山ブッシュクラフト - 番外 - 夏至祭キャンプ (#Special - Midsummer's night)

今回は通常の裏山ブッシュクラフトとは少し感じを変えて、番外編、実際のキャンプからお送りします。
先週末のフィンランドは夏至際の週末でしたので、せっかくの夏至を満喫しよう!ということで夜だけ過ごす一泊キャンプへ行ってきました。カヌーを出し、湖に浮かぶ小さな島での一泊。
もちろんキャンプの様子だけではなく、使えるブッシュクラフト的小技の紹介もあります。

OK, I have already posted the camp report of this video, but this video is for Yrayama Bushcraft, so there are bit of camp trick i have tired introduced in this video.
one is the mosquito repellent from fungi and the other one is tiny version of raapanan tuli.
hope you enjoy.


ビデオ中ではツリガネ茸で行っていますが、サルノコシカケ科のきのこなら大抵の物は使えます。また、腐りかけの木やでも同等の効果があるようです。

2012/06/28

Midsummer campout


It was the midsummer’s festival last weekend in Finland. It was really nice weather day so in the evening, I decided to spend a night out.
Since I have canoe this year and nearby lake, which I often visit, has an island, I grabbed my night out gears, mount the canoe on car then head out…

By the time my canoe touched the water, it was almost 22:00.

It look like early evening but it is the time of the year, the sun does not set..


Landed on the island, set up the camp for the night. The Location I used did not have designated fire pit / Place so made very small version of Raappanan tuli (Finnish Woodsman’s stove) for coffee making and repelling mosquito. 

But the mosquito this year seems to be more than usual. Smoke from the fire was not quite enough, so lit the finder fungus.


This seems to have worked well as on the end of trip, I did not have any mosquito bite.


Was doing this and that… the time passes fast. 


It is little passed mid night, only sound around are bird singing and fish jumping. The sun is in its lowest and it just behind the forest tree line. I have enjoyed the view for a while then got on to hammock. Still could do some reading with natural light, so did little catch up on books I wanted to finish reading…


It was my second time using hammock for night out. I should have had better insulation on my back that I felt little cold in the night. But slept quite well till a water bird decided to wake me up.


Made morning coffee then the time to break the camp.
It was a location / island which I quite often go to spend some time, but it was a first time spending over night there. Night out on island in practice is not much different than in woods or forest, but gave me wonderful feeling, different from any other night out I have done.

2012/06/27

SCHO-KA-KOLAストーブを作ってみよう!

リクエストがありましたので、SCHO-KA-KOLAアルコールストーブの自作ハウツービデオ作ってみました。予定していたよりもかなり長めのビデオになってしまいましたが、「出来るだけ詳しく」を目指しましたのでよろしくお願いします。

Made how to build your own SCHO-KA-KOLA Stove video. It is with Japanese text explanations, but should be clear enough to understand what is happening without reading the text.


2012/06/21

裏山ブッシュクラフト - #07 笛(#07 Whistle)


今週末、フィンランドは夏至際。夏まっさりで子供たちは夏休み! 

ということで、今回の裏山ブッシュクラフトはお子様と一緒に楽しめるブッシュクラフト工作、柳の枝で簡単に作れる笛2種類の紹介です。(刃物使いますので、そこは気おつけてくださいね!)


材料は柳の枝一本、大体男性の親指くらいの太さの物が加工しやすいと思います。
柳(猫柳など)は湖畔や川縁を探すと見つけやすいと思います。また、柳以外の木でも使える物があります。柳が簡単に見つからない場合は「成長の早い木」、「若木で厚めの樹皮が付く物」をメヤスに試してみると良いかと思います。


では、作り方はビデオでどうぞ!

Mid summer festival is coming this weekend and kids are out of school. So, here is something you could enjoy crafting with kids!(just be careful with the knife around kids).


the material you need is a willow stick. I am showing 2 different ways of making whistle in the video and both are very easy to make.

Have fun crafting and have a good midsummer's day!


Gear Talk - Test your gear!

On the end of last post, I have started to talk about the testing gears before actual use. I think this is a good topic to cover, so let me talk bit about it.

(Note: the methods and all I share here are how I do and what I think is good enough. but since I am not professional on this field, I can not say that it is correct information. Therefore I can not take any responsibility over what you do based on the posts of this blog. please understand that all you do are your own responsibility at your own risk. Also understand that test is a test. The result never can ensure the out come of real use situation.)


There are many different ways I test my gears and of cause, the test methods differs on type of gear. but usually, I go through 2 different (in some case 3) stages of testings. first the Moderation test and then  the Field test.


These 2 I have mentioned on last post as well, but will explain them in more detail.

Moderation test:
This is a test I perform in "Moderate" condition. usually done at home, inside or out side. Done in fairly comfortable situation for the gear and myself.


Field test:
This I perform after the moderation test and on the actual field, usually done during short hike or day trip. So can simulate the real use condition better but in case of failure, it does not cause serious problem. 


I also have mentioned the 3rd test. this test is applicable only for DIY or self modified gears and done during making or modification process. Kind of equivalent to unit testing that I test the part which I finish making as it's done.


let me give you an example, so can get the idea what exactly I do...


For the case of shelter:
Moderation test ;
on my backyard, flat and evenly soiled ground, day light, no rain condition. set up the shelter as i intend to use.
Check; 
- all parts are available and correctly usable
- how to set up.(set it up and down several times to practice. get comfortable with process.)
- how well it stands. (shake it, push it, pull it... see what happens. understand the limit.)
- spray the water or wait for the weather to turn :) (use garden water spray in different settings, distance, shower water to shelter, directly or indirectly, understand the limit.)
(FYI: some shelter has rain resistance indicated with "mm". 500mm is about light raining. 1000mm is about normal rain 1500mm strong rain.)
- sleep in it if you can (nothing tells you better than spending night in it!)


canvas poncho shelter testing under real thunderstorm
testing different configurations
testing different configurations 


Field test;

On the field where typically I would go, choose spot as real case scenario, set it up as fast as possible.
Check; 
- select few different set up spot option and try it all.
- try different set up configuration (if shelter allows) and see if all parts are sufficient to accommodate all. 
- how well it stands. (shake it, push it, pull it... see what happens. understand the limit.)
- sleep in it if you can (nothing tells you better than spending night in it!)
This shelter was field tested during 2 nights trip. had good shelter next to it in case of fail.
the example was for my DIY shelters, but basic idea of how I test is the same for all other equipment. like back pack and bags, check and test at home, loaded up max, carry it around the house, see how I feel. then take it to short trip, check same thing.


As I have written like this, it sounds like I do extensive testing process on every gear on one go. In reality, I do it as the chance comes along. like the German army poncho shelter, I did not really do the moderation test because the poncho has been in use for some time as temporary shelter and the risk getting in to trouble because of the shelter was very low on that trip, as there was permanent laavu next to it. 


Well... I think you get the idea of how much preparation I put on my gears.  Outdooring, camping, trekking, bushcrafting... all are suppose to be fun and enjoyable.You don't want your gear giving you a hard time or disturbing your precious outing, do you?

2012/06/20

Gear Talk - Redundant

OK, so here are what I typically would have for overnight trip to more.

Main back pack with:
 Sleeping bag
 Shelter
 Rain poncho
 Ground sheet
 1 set of clothing
 1 set of cook kit
 Full FAK
 1L water bottle
 Axe
 Food bag (with food)
 A hat
 Sleeping mat

Then in the side bag and on the belt:
 Canteen set
 Kuksa
 Stove and fuel
 Puukko
 Emergency fire kit
 Map & compass 
 SAK(Victorinox)
Dump pouch (this item is missing from picture)


Depends on the season and weather, I also add extra clothing like wool sweater, wool under shirts and jackets, but this basically covers all I need for most of trip.

now, the part I would like to point out is that this set up contains several redundant items. The obvious are the blades, I have 4 knives and 1 axe packed. Puukko (main knife) on the belt, 1 SAK in side bag (the secondly knife), other SAK in FAK (for medical usage needs, keeping this as clean as possible at all the time) and one folding knife in fire kit. All these have primary usage but meant to back up each other. so all of them are packed in different locations. So if one goes missing, still have something.

Same idea goes to fire starters. one in fire kit, one in cook kit (main use). one in my pocket (oil lighter or matches for quick needs) and sometimes one more on knife. also fire starting aid are available in fire kit and many items from FAK, like hand sanitizer, disinfectant and cotton pads.

what about water? I have main container in back pack and small one in the side bag. Same thing with cook kit. main cook kit and canteen cup as a backup for boiling water.

shelter??? One I am wearing and one packed. poncho shelter is parted in 2 pieces. half is for rain poncho and other parts are packed in the back pack. the ground sheet could be used for covering as well and of cause emergency blanket is in the fire kit.  

for emergency signaling, I have phone, whistle, mirror, flash lights, fire.

the only item i do not have back up is for the navigation and I am working on it, but have not found the solution I like. You might say, what about phone GPS for that? yes, it can be used but not very reliable because of battery life... so I am NOT counting on it.


So, all of my gears have back up and when I listed up like this, it sounds over doing. But think of it, I do not have any extra gear packed just for back up purpose. all of them are needed or I anyway do carry, it just those have the primary function and  secondly  function. Also most of the secondly functions each item has are still in the range of its intended use (some might be pushing a bit...), so still safe and sure to use.

Talking about safety, one thing I really would like to point out is that "Never take an item you have not tested yourself". Especially the one you made yourself or modified yourself, but also for the equipment(s) straight from the shop.

DIY and modified gears are clearly not trusted until proofed.  But one from shop also should be tested before actual usage. so you know exactly how to operate, how it react to different conditions.

Fail of equipment might cause serious un-comfort or in some case  
might harm your health. So, tested on your back yard (moderation test) till you are comfortable with it, and if possible, take it with you to short hike or day trip to test (field test) it again.. 


2012/06/18

Gear Talk - What Am I Packing?


This is a topic, I wanted to cover for some time now, but have not got clear idea of how to present it, so that not going to be the post of what I have.

First, I would like to point out that the set up / combination of gears I introduce here are not permanent, as I change them constantly as I see needs, experiment, change of skills, and change of gears. Also this is what working for me, so does not mean that it works for you.


Let’s start with my main backpack. It is a vintage SAVOTTA Saddle Sack 323. This pack has been in production since 50’s. With slight change in material, the model is still in production.


One large main compartment (about 50L), 2 side pockets (30cm depth 10cm width), one wide pocket (15cm depth 30cm width) on back face. 

The pack is fitted with steel pipe structure, which is removable for maintenance needs. The pack material is rubber backed cotton and all straps are good quality leather.
The adjustments of all straps are with classic buckles. The only strap cannot be adjusted is the one goes on to hip.

I find this pack to be just good size for 2-3 nights trip (I have not test pack it for longer time needs...) and quite easily packs everything I need in good order.


Long side pockets can accommodate; 1L water bottle, which is my main water storage on one side and the other side, I can fit one German army poncho. thaw, it requires tight folding to fit it in. 
In the back face pocket, I keep Maxpedition FR-1 which is my full FAK and cordage bag.


In the main compartment, there are no divisions or pockets. It is simply one large space, so any kind of large gears fits in nicely.  
In the picture, I have fitted a shelter made from German army poncho, a 3 season sleeping bag, one set of closing, 2days worth of food and Swedish army cook kit. These are not at all squeezed tight, and yet still have plenty of room left. I usually carry smaller cook kit to save up space and weight, but I placed Swedish army cook kit for the demonstration purpose, so you get the idea of size.
For other large items, like sleeping mat, ground sheet and axe, I strap it on the top as this pack has 3 straps for that purpose. (See the picture on right)


Let’s move on to next pack. I usually carry a second bag, which is smaller and goes on side of me.
Lately I have started to utilize Finnish defense force gas mask bag as my side bag. I carry this type of bag for the purpose of carrying small items which are need to be quickly accessed and often. Also, this bag will act as scout bag for short trip.


It can accommodate all I need for short trip (up to day trip) and is usually packed as can see in picture.
It places everything quite neatly and when closed and strapped to my body, it is quite comfortable. But I must point out that the one I got has bad snap button on closer. So time to time, it snaps open itself. This, I need to fix it somehow…


The items I carry in this pack are;
Swiss canteen M32  (secondly water storage + secondly cooking cup). This fits to center inner pocket.
Scho-ka-kola spirit stove and spirit container (from Nalgene). These goes to second large inner pocket.
Orienteering compass (Suunto M3G). goes in to smaller pocket.
Pen and SAK goes in to pen pocket.
Lest of the items; Poncho, kuksa, area map and food bag goes to main compartment.
There are elastic bands in the bottom of the bag, but I have not utilized it yet.
(note: the poncho is packed in here only when I use this bag as a scout bag.)


There is one more pack (actually it is a pouch) I carry all the time. It is my emergency fire kit.
Before I show you this item, I would like to point out that this is an extended emergency FIRE kit. Not a survival kit or PSK. Also, this goes to my belt with puukko and dump pouch.


Here is how it looks when packed closed and opened. 


And here are the contents;
Emergency blanket, 3m cordage, magnesium fire starter (USAF type), Vaseline-cotton balls (in the plastic case), 2 grill fire starter and folding knife.

This is a kit aimed to aide me to get “Sure Fire” in any condition and fast. 
So far, with my experience in Finland, my biggest concern is “Heat”. As you know, Finland is a cold country. Even in summer, it is normal to have temperature goes lower than +5 degrees. If you are talking about Lapland, you could expect snowing or close to Zero degrees.

So, able to make  good fire, fast is important...
- Magnesium fire starter for very strong fire starting spark.
- Vaseline-cotton for about 5min/ball of sure fire.
- Grill fire starter for 30min/cube of sure fire.
- Emergency blanket + cordage for shelter. 


Continue to next post of "Gear Talk"

2012/06/16

裏山ブッシュクラフト - #06 ツリガネ茸 (#06 Tinder Fungus) Part 2


#06 ツリガネ茸のPart2です。
前回は採って来たツリガネ茸の要らない部分を切り取る作業まで紹介しました。今夏は煮る作業から完成までの紹介です。
ビデオでは撮影上の都合から自宅のキッチンで重曹を使って処理しました。ブッシュクラフトらしく屋外で焚き火を使う場合は、重曹の代わりに灰を大量に入れる(灰汁と呼ばれる物ですね!)ことで同じ作用があります。この灰汁は、重曹のない時に山菜などのあく抜きや、洗剤無しで食器の油汚れを落とすなどにも使えますので覚えておくと便利だと思います。

では#06 ツリガネ茸のPart2をどうぞ!


This time is a part 2 of #06 Tinder Fungus video.
Last time was till removing the part not needed from fungus. this time is boiling process to completing the amadou.

In the video, because of the video shooting convenience, I have boiled the fungi in my kitchen using baking soda (not baking powder). but if you are doing this in the forest, you can use large quantity of ash from fire. this works same way as soda.
Ash water mixture is useful trick to remember. you can use it to wash grease off, processing some of wild edible to soften the bitterness and so on.

so, here is the 2nd part of the amadou making. hope you enjoy!


2012/06/15

Needle case

I was planing on making "My backpacks" post and was started typing it. but then I got bit stack on direction.... so that post will come, but I need little more time...


However, I have other topic would like to shear.
As one of the BcFin skill test - Handcrafters patch, there is a task to make "Needle case from natural material". this is something I wanted to make for sometime and the material I need for this was finally ready to be used, so I gave a shot.

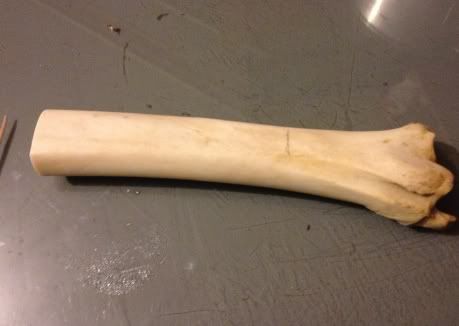
The material used was the deer bone I got from BcFin spring meetup, nettle fiber harvested from my yard, pine resin corrected from forest, leather and beeswax bought from shop.

first i cut off the needed length out of bone, then shaped to desired shape using only knife. it is not difficult to shape bone with knife, but surely was hard on my knife. I needed complete resharpening after this task.... but good finding was that the blade did not take any chippings.


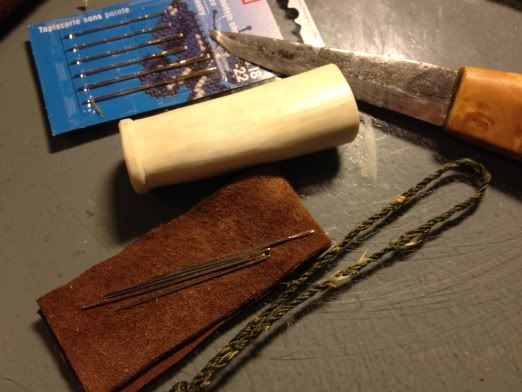
here are the all components lined up. Nettle fiber are boiled in ash water solution and 4 strains twisted.
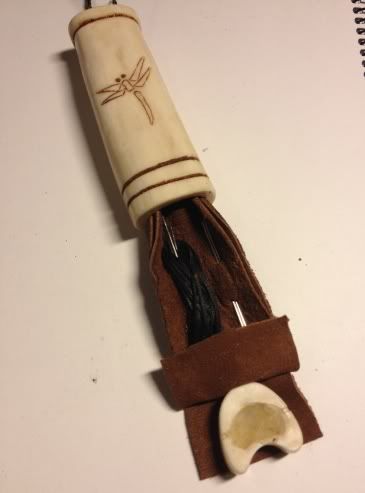
leather is cut to size, i decided to use folded sheet to get more friction when the needles are in place.


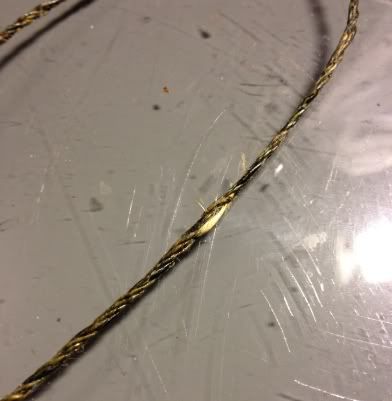
when the nettle cordage gets dry, it shrinks and twist gets loose. also this will be hanged from belt, I need to make this cordage somehow even stronger. so, made some protecting agent.
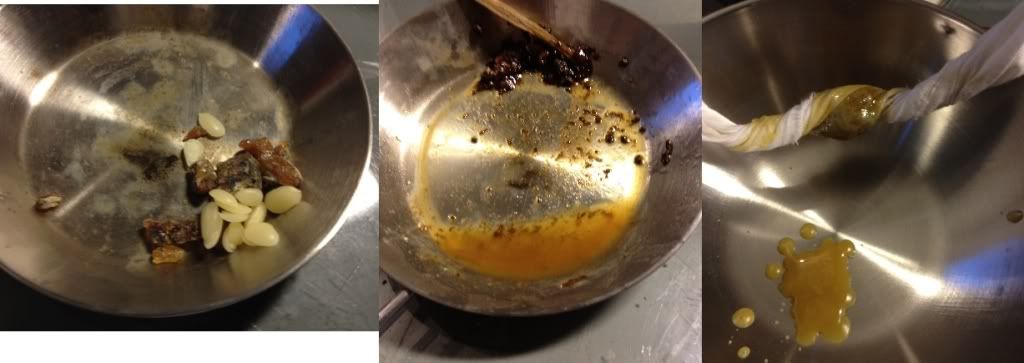
it is a mixture of pine resin and beeswax.melt them together, then strain it using cotton cloth.


Once the mix is cooled, apply it on nettle cordage then rob it hard. the heat generated by robbing will make the wax+resin mix soak in to cordage. This makes the cordage much stronger by adding great water repelling and wear resistance.


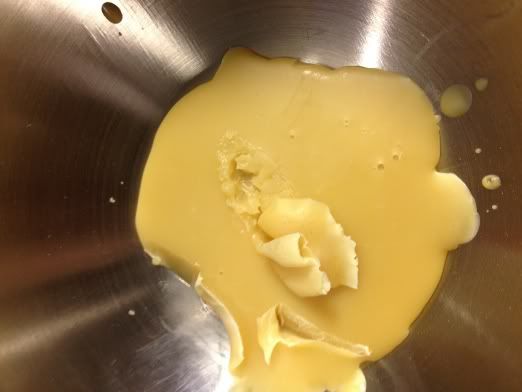
Then it is time to put all together.... but while I was at it, I wanted to add one more component. if this is meant to be used for sewing leather, it will need thread wax. so add more beeswax in to previous wax+resin mix, made home made thread wax.


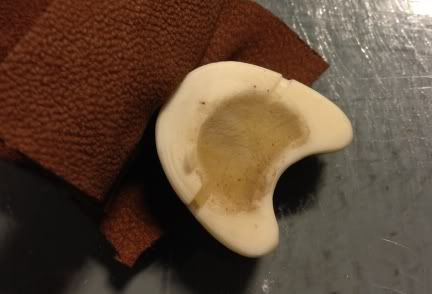
Stuff this in to bottom button so when I need more wax on the thread, I just need to run the thread through the wax.


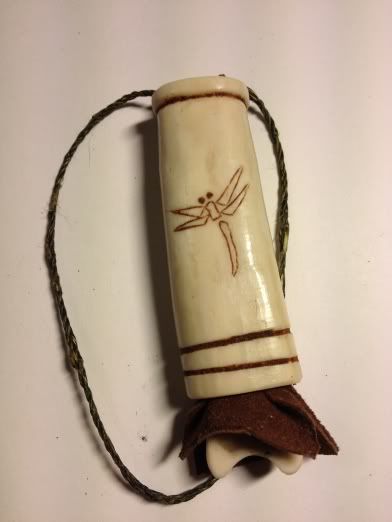
Now, every thing is done. I also engrave bit of decorative markings and my logo, colored it with the powder made from inner birch bark.


The traditional Finnish method and style contraction of a needle case but with Japanese taste?

Well... now I got this one, want to make awl matching to this kit, and Kuksa,,, and coffee pouch....

2012/06/11

Erämessut 2012 Riihimäki

先週土曜、2年に1回開催されるフィンランド国内最大のアウトドアーイベント、エラメッスへ行ってきました。

2年前にも行って来たのですが、今回はさらにすごい人ごみ。目的のブースを見つけるのもひとくろうでした。しかし、ブッシュクラフト仲間と会ったり、今まで欲しかったものを格安で手に入れたり。何しろ多くの物欲ギアが同じ場所に勢ぞろいですので、メーカーと話をしながら今後手に入れたいギアを比較検討する良い機会でした。

読むより見た方が早いので写真をどうぞ!

I was at Riihimäki Erämessut 2012 on last weekend. It is once in every 2nd year event and is a largest outdoor event in Finland.

There ware so many people that I felt like was there for looking at people and was job to locate the booth I was interested in.

however, it is very good chance to see all what you wish to have in one location. you can see touch, try, talk to maker to see what might be best.

well it is just easier to see than read, so here are some pictures


このティーピーはなかなか良かったです。小型ながらも、前室があるのですごく広く感じます。HelSport製
I liked this tipi. it is quite small size, but rised front makes it roomy. from HelSport
同じくHelSport製、コンパクト軽量のストーブ。20x40x30cmくらいの大きさ。
from HelSport. nice compact wood stove. size is about 20x40x30cm


ボーハンティングのデモと試し射ち。いつか免許取りたいです。
Bow hunting demo and try out. I am getting interested in doing this someday..

この折りたたみ式カヤックは良かった。スポーツバックサイズに収納できる。残念ながらカヌーバージョンは展示無し・・・
Kind of made me want one of these... one in picture is a kayak. they did not have canoe version for display...

BCFinメンバーの強い見方、VARUSTELEKA!
support the local business! our mighty VARUSTELEKA!


えっ・・ククサですか?雑魚売り状態です。ちなみに値段も格安でした。
Kuksas were in quite good price!


家のワンコたちも何時の日かはこれを・・・むりだな・・・・
I wonder, if my dogs can pull this someday.... bit hopeless....?

ターゲットの鹿に注目!
目が可愛過ぎ。射れねーよ!!

トナカイのケバッブ。 これ以上のコメント控えます・・・
reindeer kebab.... no comment on this one.... 


お気に入りブランドになりつつあるフィンランドのSAVOTTA。時間たっぷりと取ったので写真も多目。
I spend quite enough time in here  so showing more pictures. it is becoming one of my favorite brand these days.


移動可能なテントサウナ。
movable tent sauna 


フィンランドの伝統的シェルター「ロウエ」。手ごろな値段なんだけど、理由あって今回は見送りです。
Loue shelter. not expensive, but I cannot justify the purchase of this item at this moment... 


ペナラーブと言うチョッと面白いシェルター。Aフレームとの違いは支柱。テントの真ん中に一本T字型の物が入ります。張り縄が必要ないので設営簡単。
PenaLaavu. it is very interesting design. there is only one T shaped pole on center. no need for rope to tension it.


SavottaのULギアシリーズ。ULライン作ってるの知りませんでした。写真はシュラフ。45ユーロ。。。安すぎない?
I did not realize that Savotta also makes UL equipments. the picture is a sleeping bag. packed size is about 30cm on long side.
こちらもまったく未チェックだったラインアップ。タクティカル系ギアです。まーフィンランド軍に製品納めてる会社なので、フツーのながれかな~と。
Tactical gears, also from Savotta. I did not know they make this line of products for consumer market. 

SAVOTTAのヴィンテージパックの幾つかが展示されてました。残念ながら私の所有するモデルはなかったです。Some old SAVOTTA back packs was on display. My vintage pack was not among them....


次回は2年後。Next time is 2 years after.