2011/06/30

JPBK-β2 (Sheath part 2 - シースその弐)

It is not progressing as fast as I want, but can’t help it, coz I am doing this part only with knife and do not want to rush.
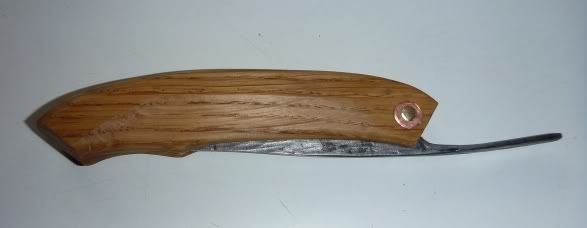
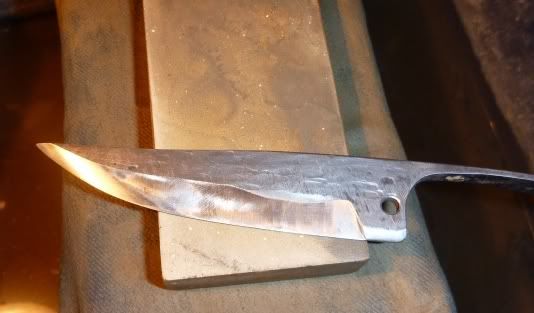
うーン・・・思うように先に進まない。ナイフだけで削りだしているからしょうがないし、急いでやっても失敗するだけだからこれでよし!


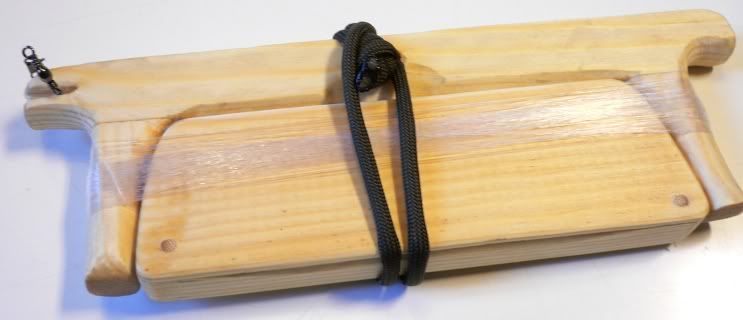
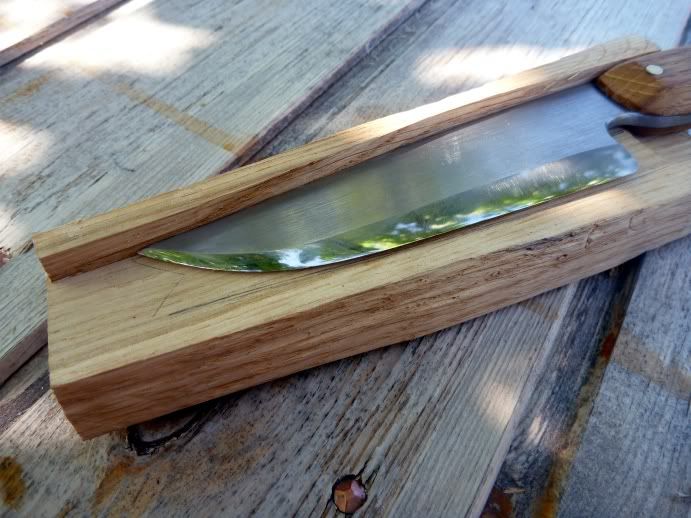
I managed to make the opening part of the sheath (Koikuchi in Katana term) and started to glue on the sidewalls.
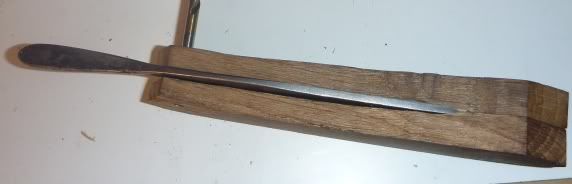
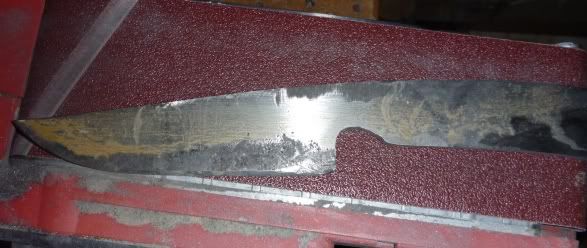
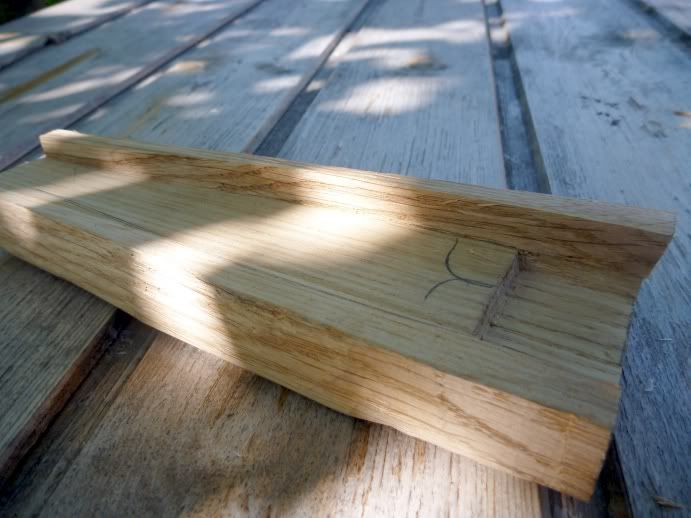
コイ口部分の削り出しは完了。刃厚分のスペーサーの取り付けに入ります。

I could hollow out entire part like making of Katana sheath, but that will take more effort. Also for a knife, I found it not worth doing it.
刀の鞘の様に全てを彫り込んでも良いのだけど、オーク材でそれやるのはしんどい。それにナイフにそこまでやる必要性も無いと思う。


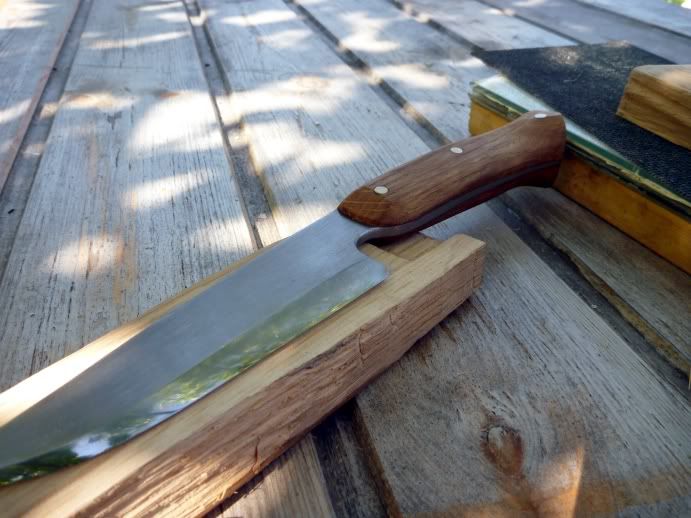
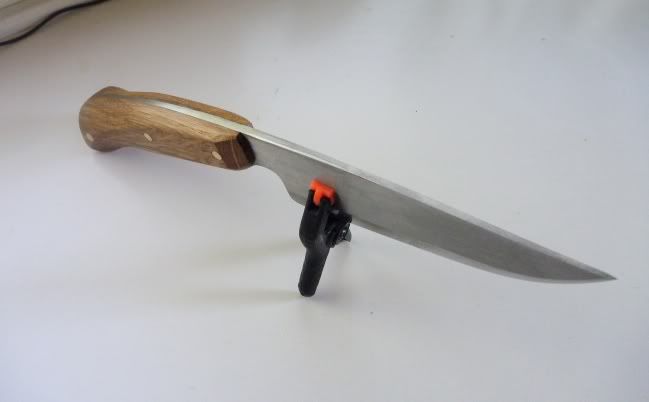
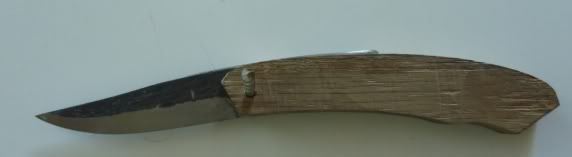
The knife will sit like this in the sheath. (one side of the wall is not glued yet on this picture.)
ナイフが収まるとこんな感じになります。(スペーサー、片方はまだ未接着)


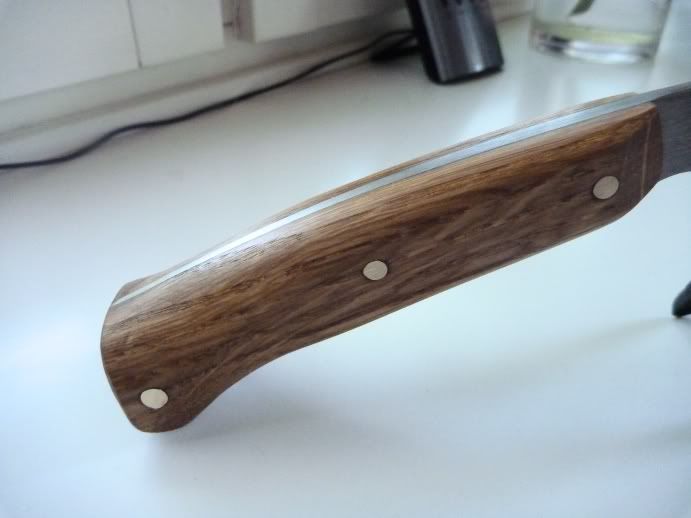
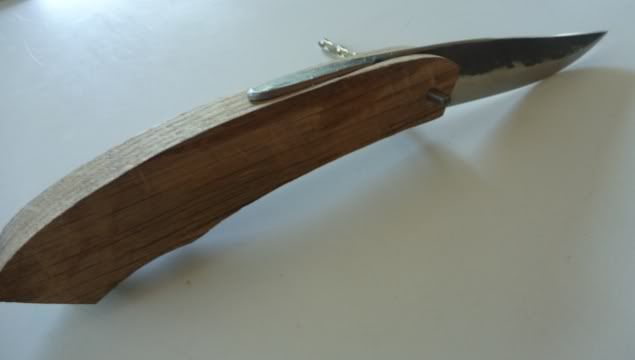
When the knife sits in the sheath, the spine of the knife will touch the wall but not the edge. Also I am making it so that I can place the knife on both ways, left or right. So I do not need to pay attention to which way I need to put the knife in the sheath. In my opinion, this is quite important function to have it on sheath.
背は鞘内部に当たりますが、刃先は当たりません。また、左向きでも右向きでも収まるように作ってます。どちら向きでも入る様にしておけば、鞘に納める時に気にする必要がなくなり、便利ですね。個人的な意見ですが、これは重要なシースの機能ではないかと・・・


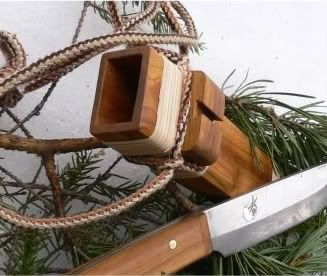
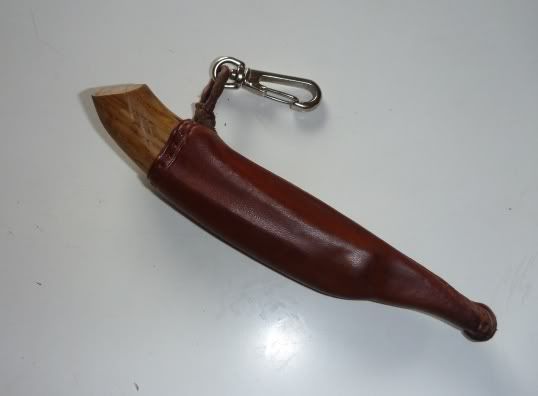
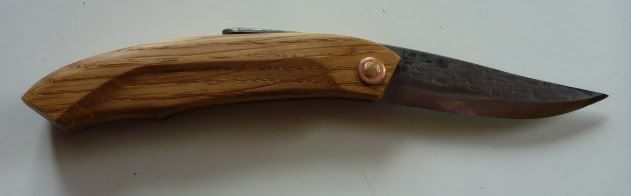
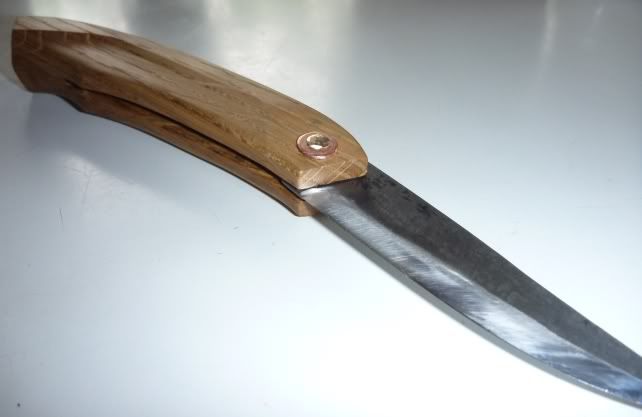
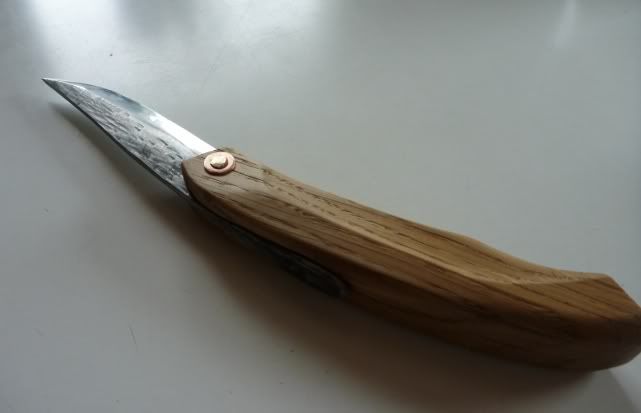
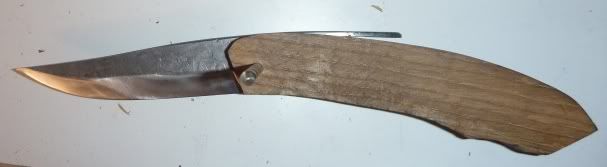
 I have been using puukko in outdoor for quite long time and I love it, but each time I put back the knife in the sheath, I need to look at the sheath and think which way it goes in. other thing about puukko sheath is that since it is leather, I need to watch out not to cut the sheath. Other issue I have with puukko sheath is that I need two hands to get the knife out. So the wooden sheath will have the solution to all this.
アウトドアではプーッコを長いこと使って来ました。ナイフ自体はとても良いのですが、シースはちょっと使いにくい部分があります。
出し入れの際に、どうしてもシースに気を使う必要がある。片手ではナイフを抜けない、入れる方向を考えないといけない、など使いにくい要素があります。木製シースなら簡単に解決できてしまうことばかりです。


Now I am gluing the other side of the wall. Still have few steps to take before starting the cosmetic fix on this sheath. Well I am not in hurry… not yet.
外部の整形に入る前に、まだまだ細かい修正作業をする必要があります。まあ、急いではいないのでゆっくりと確実に作っていきます。

2011/06/29

JPBK-β2 (Sheath - シース)

So the knife is sunbathing to get oil cured, I was at making of sheath.
ハンドルに塗ったアマニ油を硬化させるためにナイフが日光浴している間、シース作りに取り掛かります。


I am going to give a wood sheath for this knife, since I really like the one I made for the beta1 knife. Using oak taken from same log as used for handle and carve out the opening to fit the part of handle. This system is used on traditional Ainu Makiri knife and I have done it on my previous knife. It works really well and will not come out accidently.
使う材はハンドルの材取りしたのと同じ丸太から切り出し。β1で作ったシースがかなり気に入っているので、オークのウッドシースにします。コイ口の所を彫り、ハンドルの一部がはまる様にします。アイヌマキリと同じ方式で、前回作った物でテスト済み。非常に良くホールドしてくれて、抜け落ちることはまずありません。
(This is from β1 - 写真はβ1の物)

However, I still need to figure out the nice way to lock the knife to the sheath. Even it is quite secure without it, you never know for sure. I have few ideas about it, just need to see if that works.
『抜け落ちることはまずありません』とは言った物の、やはり何らかのロック機構は無いと心配です。いくつかアイディアはあるのですが、上手くいくかどうかは試さないことには・・・ 

2011/06/28

Finally progressing - やっと前進 (JPBK-β2)

Finally manage to HT so progressing the constraction on this knife.
やっと熱処理が出来ました。熱処理さえ終わってしまえば、あとはサクサクと進みます。

Right after HT. 熱処理後。


Sharpened and whittle out the handle material to shape, then gluing.
刃を研ぎ出し、ハンドル材を削り出す、そして接着。

I like using just made knife for making handle to shape. I do this as part of testing. I have sharpened the this beta2 knife as sharp as I can shave my face, then whittle the very sasoned oak. When I finish the handle, I see no visible damage to the edge and can still shave face. This seems to be the best blade I have manage to make.
いつもやるように、出来た手ホヤホヤのナイフ(作製中のナイフ)を使ってハンドルを削りだします。これはブレードテストを兼ねて行うのですが、今回のブレードはかなり成功のようです。髭がそれる程度に研ぎ上げて、カチカチに乾燥したオークを削ったのですが、削り終わった時点で、刃先に目視できるダメージは無し。髭もまだそれます。


Rivet the pins and oiled.
ピンをカシメてオイルを浸透。

Now it is drying
現在乾燥中

this time, I am making the handle shape little closer to Japanese chopper (Nata). See, if that works out…
今回の柄は、日本の鉈の形状にちょっと近づけてみました。どんな感じになるのやら・・・

2011/06/22

Nettle - イラクサ

Last evening, when I look in to the fridge, there was good mount of lightly boiled nettle sitting. It was a left over of my wife’s nettle soup. We thought it would be pity to waste it, so I came up with this recipe the nettle omelet. 
昨夜、小腹がすいたので冷蔵庫を開けると、湯がいたイラクサを発見。妻のイラクサスープで使った物の残りだ。このまま残しておいてももったいないので何かを作ることに・・・イラクサのオムレツだ!


Chop the nettle in very small and squeeze the water out very well. Lightly fry it in pan with enough butter, add bit of salt and pepper. Then take it out to some plate. Using same pan to fry lightly whipped egg, place nettle and feta cheese on center and wrap it with omelet.
イラクサをみじん切りにし、良く水を切ります。それをバターたっぷりのフライパンで軽く炒めて、塩コショウ。次にオムライスの要領で卵を焼き、用意したイラクサとフェタチーズをたっぷりと包み完成!


This was surprisingly good. I got this idea from Greek spinach pie + rice filled omelet. Since you will need eggs, might not be suited for outdoor cooking, but for sure, is good for cooking at home and consume large mount of nettle, which grows on my back yard.
これは意外と美味い!ギリシャのホウレンソウパイ+オムライスから思いついたこのレシピ、アウトドア向けには卵がいるのでちょっと難しいが、家ではOK!ついでに庭に生え続ける大量のイラクサをもったいなく処理できるので更に良し!
ちなみに、この料理方法なら、多少育ってしまったイラクサも柔らかく美味しくいただけます。

2011/06/21

Annoying...That what it is! 苛立たしい事この上なし!

These, it is truly annoying
I have my JP-BCK project – beta 2 knife, ready to be heat-treated for past few days now. As I do not have shed to protect my forge from rain or make shade from san right, I need to work on not raining nighttime. But, every evening, when out side is dark enough, it starts to rain…
苛立たしいったらありゃしない。
和式ブッシュクラフトナイフβ2が熱処理待ちだと言うのに、火床に火を入れられないのだ。
作業小屋を持たない青空鍛冶の宿命、『天日と雨をさえぎる物が無い』問題を解決するために、熱処理だけは夜暗くなってから行う必要がある。しかもここはフィンランドの夏、白夜である。火色、鉄色が確認できるほど暗くなるのは曇った日の22時過ぎ。しかしここ数日、この時間になると決まって雨が降り始める。


So, out of frustration, I have started to make handle already. I was thinking of using cherry, but the friction folder I made turned out quite nice, so decided to use oak again. Also I like the toughness of this material and I think it suite the knife.
仕方が無いのでハンドルを作り始める。肥後プーッコでオークハンドルが意外と良い感じだったので、桜の予定を変更しオークを使用。この材の硬さの方が多分このナイフには合っていると思う。

Well… naturally, making the handle for the JP-BCK– beta 2 is not enough to occupy this extra time, so I have completed the Friction Puukko as well.
I could not decide if I want to set this up permanently as a neck knife or a belt knife. So, I made it so that works anyway I wish.
もちろん、ハンドル作りだけでは余った時間は埋まらないので、肥後プーッコのシースも完成させました。結局、ネックにするかベルトにするか決められなかったので、どこにでも下げられるように仕上げてみました。


With this hook, I can hang it anywhere I want. Also, I have finished the leather with oil. I like this color better than leather dye and protect better from water.
このフックをつけたことで、どこにでも下げることが出来るようになりました。革も、ワックスとか染色ではなくオイルフィニッシュです。この色結構好きですね。撥水効果もこの方が良いです。

2011/06/17

肥後守プーッコ – Friction Puukko

とあるフォーラムで、フリクション・フォルダー用のシースについて会話が盛り上がっています。その中で、ある方の出したアイディアが気に入ったのでちょっと拝借し、自分なりにアレンジして作ってみました。
コンセプトは『プーッコ』。このナイフ、肥後守式ナイフですが、プーッコぽいので『肥後守プーッコ』と命名、シースもそれに合わせて出来るだけプーッコらしい物を合わせて見ます。
Last night, I got some idea from knife forum discussion so, I was putting the idea in to actual shape.
Since I am calling this knife a “Friction Puukko”, I thought I will try to give a sheath as puukko sheath looking as possible.
And here is the result…


プーッコらしく見えますかね???まだ、コバ処理とストラップをつける必要がありますが、一応完成。ここまで出来たら、ネックにするかベルトにするか迷い始めてます・・・
I still need to add belt loop or neck strap, also need to put little more wax and shine the edge. But more or less completed as it is. Hope other than me can see that is puukko…

2011/06/15

肥後守式小刀・Flriction Folder (5)

完成しました!ハンドルはフラット、シンプルにする予定だったのですが、削っているうちにこんな感じになりました。私のハンドル作りはいつもそうなのですが、行き当たりばったりで、削りながら握りやすい形にします。
So here comes the completed one. The original plan was to make handle simple and flat, but… as always, I make handle as it comes. The important thing is that fells nice in hand.


スペックは The spec:
 刃渡り(Blade length): 9cm
 全長 (Total length): 21cm
 刃厚 (blade thickness): 3mm
 鋼材  (Steel): ヤスリ- metal file
 ハンドル材 (Handle materials):
   真鍮ピン- Brass pin
   銅ワッシャー – Copper washer
   オーク- Oak

初めてのフォルダー、やはり苦労しました。シースナイフとはかなり勝手が違います。マーそれなりに満足かな??様子を見て、便利に使えそうならネックナイフとして使ってみようかと思います。
So, what do you think? Personally, it is quite satisfying result. Now use it a bit and if find it use full, then I think will set this up as a neck knife.

2011/06/14

Everyman's right – 全ての人の権利 – Jokamiehenoikeudet

(日本語版記事は、英語版の後に続きます)

<In English>
I have been enjoying the beautiful Finish nature and making post on this blog for some time now, yet, I have not posted this topic.

In my humble opinion, there is nothing more important than knowing (understanding) the Finish “Everyman's right” when going out to Finish nature. On the other way of saying, without this knowledge, you really should not go out there.

Everyman's right (Jokamiehenoikeudet) is the rights granted to all man, and important Finish legal concept. And it gives everyone the chance to enjoy outdoor pursuits, and the freedom of the country’s vast forests and fells, and many lakes and rivers, with few restrictions. (* ref. the booklet of Everyman's right in Finland)

Basically it tells you what you can and cannot do while you are in Finnish nature and has been working to protect the land, landowners and outdoor enthusiasts.
It really is a commonsense, like do not disturbed others and do not destroy the nature and reassess… but this also includes how to achieve that while keeping the most important rights of all, Freedom of accessing to country’s vast forests including public access to private land.

I am not going through the content of this rights, because it is better if you read it yourself the official materials.
So here is the links to Ministry of the Environment pages.
You can read the good “in brief” from <http://www.environment.fi/default.asp?contentid=381395&lan=EN>
Or  you can download the long version booklet from < http://www.environment.fi/default.asp?contentid=104523&lan=en&clan=en>
I also recommend reading this for who are not coming to Finland to enjoy the nature. I think you might find that this regal concept is very interesting.


<日本語>
今まで、フィンランドの自然を楽しみ、その様子をこのブログで紹介してまいりました。が、フィンランドの自然を満喫する上で、一番重要なことを紹介し忘れていました。全ての人の権利 – Jokamiehenoikeudet(ヨカ・ミエヘン・オイケウデットと読みます)これを知らずにフィンランドの大自然へ立ち入るのは非常にマナー違反でしょう。極端な言い方をすれば、『立ち入る資格無し』です。

『全ての人の権利』とはフィンランドの自然を楽しもうとする人全てに与えられる権利で、フィンランドの法律の中でもとても重要なコンセプトです。
簡単に言いますと、フィンランドの自然を楽しむ上で、やって良い事、いけない事を具体的に示した物になります。


内容を簡単に紹介すると・・・
可>
庭、畑、住居とその近くを除く地域は自由に歩行、スキーもしくは自転車での通行OK。
テントなどの設営、短期間の滞在(2-3日)は住居から十分離れている場合や森の中なら、どこでもOK。
ベリーピッキング、茸狩り、野草の収集は、保護品種でなけば自由。
湖での竿と釣り糸を使った釣りはOK。(リールを使う釣りは不可!)
ボート類の水路での使用はOK。制限域有り!用確認。
凍結した水域の歩行、スキー、つりはOK.

不可
他人に迷惑をかける。公共物などの破壊、破損。
鳥類の繁殖を妨げる、もしくは巣や雛に何らかの危害を加える。
トナカイや、狩猟動物に危害を加える。
木を切り倒したり傷をつける。コケ、藻類の採集。他人の物への危害。
私有地での焚き火。(緊急時を除く)
他人の家の近くで通行、つり、キャンプ、大騒ぎをする。また他人のプライバシーを侵害しない。(許可の有る場合は除く。)

この様に非常に基本常識な事ばかりになりますが、これらは自然、土地所有者、そしてアウトドアを楽しむ人のそれぞれをバランスよく守るためには必要なことです。
たとえば、土地所有者を守るために、『焚き火はだめ、でも直ちに消火が可能なキャンプストーブはOK』。アウトドアを楽しむ人を守るために、『私有地により立ち入り禁止!のような看板は禁止、でもアウトドアマンは所有者の物をリスペクトしてね!ダメージちょっとでも与えたら絶対あかんよ!』。
自然を守るために『木を切り倒したり傷をつける。コケ、藻類の採集は禁止、でも森の恵みはじゆうにどうぞ!』などと双方に自由と制限を与えています。

フィンランドの環境省(Ministry of the Environment)のぺージで全文が読めるので、興味のある方はぜひどうぞ!自然と楽しく付き合うためのヒントが詰まっていますので、フィンランドでアウトドアしない人にもぜひ読んでいただきたいと思います。
英語版要約→ <http://www.environment.fi/default.asp?contentid=381395&lan=EN>
英語版Everyman's right in Finland全文PDF→< http://www.environment.fi/default.asp?contentid=104523&lan=en&clan=en>

2011/06/13

Hobo fishing kit - 放浪者の釣具

I have made this hobo fishing kit last autumn yet, haven’t got chance using it for real. I thought I will have chance using it last weekend, so I packed it to may bag, well…. Still I could not find the good chance to use it….
このホーボーフィッシングキットは昨年の秋ころに作ったものなのですが、いまだに使うチャンスに恵まれてません。先週末は一応パックに入れて出かけては見たものの、釣りをするだけの時間的余裕がなく、またもや未使用。


However, I have made tiny modification to it. What I have changed is how I store the fishing weights. Till now, I could not find the good solution, so was packing it in separate container. But the idea came when I was pushing the painkiller tablet out of that laminated package. “This system can be used!!” so this is my solution! Laminating the fishing weights with paper and tape.
しかし、ついでなので少しだけキットに変更を加えてみました。変更したのは重りの収納方法。どうしても上手く一まとめに収納出来ず、今までは別の入れ物に入れていました。それが、頭痛薬を押し足している時にふと思いついたのです。『この、薬のラミネートパックは使える!』と言うことで、錘をノートの切れ端に、セロテープでピタリ!完成です。


This seems to work well and as can see from picture, it fits nicely in the box. Also it will keep the tiny weights in place. I suppose I can do same thing for the fishing hooks as well for my pocket survival kit.
やってみて正解!これなら重りがコンパクトに一まとめに出来ます。使うときも簡単。この方法は、ポケットサバイバルキットの釣り針にも使えそうです。

2011/06/09

肥後守式小刀・Flriction Folder (4)

イヤー苦労した。ハンドル、なんだか知らないけど、削っても削っても合わさり目に隙間が出来てしまい3本目にしてやっとOK。
Well... making this handle was pain in the ass. The problem was that I could not get the gluing face dead flat and kept making gap. But on 3rd try, I finally got it.

ハンドル材二枚を貼り合わせ完了!後とは微調整を行うのみ。特にチキリの部分はもっと平らにハンドル部に入る様に調整。
Now the 2 parts are glued, so I only need to make small adjustment. Especially the rip (I do not know the correct word for the thing which is sticking out like tang.) part needs to fit in to the back line of the handle.

和式ブッシュクラフトナイフβ2の方のハンドルも考え始めないと・・・
I should start to desagin the handle of the Japanese style bushcraft knife beta 2 as well...

2011/06/06

肥後守式小刀、そして・・・Friction Folder and…

週末に焼入れしました。
So I have done the heat treatment to the blade on weekend.

まずはテスト焼きを同じ素材で行ったのですが、これがまた???オイルでは焼きが入らないのです。いつも使っている古ヤスリと同じメーカーの物なので、いつもの様にオイルで冷却したのですがどうがんばっても焼きが入らない。そこで、やけになって水で冷却したらすんなりとキンキンに焼きが入りました。テスト焼きして良かったです。
Since I have used the usual old file from same brand for this blade, I was not planning on doing the heat treat test. But since long time I haven’t done this, I decided to do the test on last minute and that was a good call…
Usually I use oil for this steel, but this time, doesn’t matter how I do it, it does not harden. So I gave up on oil, and tried the water quenching… that did the job.

写真は焼き戻しを完了した状態。小さいナイフなので、切れ味優先で硬めです。そりもシャムキも出ず上手く焼けた様です。スカンジエッジにする予定なので、硬すぎなければ良いのですが。
The picture is the right after the tempering. Small blade so made it hard to achieve sharpest possible edge. Hope I did not make it too heard, coz planning on putting scandi edge on it.


刃付けの開始。硬めにした割には砥石あたりは良好。刃付けが終わったら硬さの確認です。
Putting the edge. Made it hard but feels nice on sharpening stone. Once this is done, need check the toughness.


そして、久しぶりに槌を振るう時間がしっかり取れたのでもう一本。長いことオアズケになっていた和式ブッシュクラフト・ナイフの試作2号。本当は割り込みで作りたいのですが、ちょうど良い軟鉄材が手元になかったので全鋼です。
今回使ったのはゾーリンゲンの鉄ヤスリ、ちょっと楽しみな鋼です。
And, finally got time to do real forging, so one more blade. It is a long time waited Japanese style Bushcraft knife project – beta 2. I would like to make this with “Warikomi” but did not have good size iron, making it with full steel this time. The steel used is old file from Solingen. And I am looking forward to see the result of this steel.

和式にはあまり見えませんか??全鋼でフルタングなので仕方がないですね。
それにしてもこの素材は伸ばすのが大変でした。刃の成形が終わった所で腕が疲れきってしまったので、タングの方は大まかな形だけ出してグラインダー成形します。
Doesn’t look much like Japanese style? Well it is full tang and single steel, so cant help it…
However, this material was tough. After forming the blade, my arm was done. So just managed to form rough shape out of tang and will leave it for grinder.


まー和式に成らなかったら、それはそれで良しとします。
Well, if this does not come out like Japanese style, then that still is OK.

2011/06/03

肥後守式小刀・Flriction Folder (2)

今ここまで出来ました。ハンドルと刃の収まる部分を大まか削り出し仮組。
so now it is at this stage, temporaly fitted to see how it fits.


まあまあの収まり。まだもう少しぴったりとハンドルが合わさるように削る必要はありますが、ほぼOKでしょう。今夜か、今週末に熱処理しようと思います。
I think so far so good..? I think I might go for the heat treatment tonight or this weekend.

2011/06/01

Handle material? That is the question…

Originally, I was thinking of using Japanese deer antler as a handle material for this knife. But once I have set the blade shape as I please, I realized that have made it too large to fit in to the antler I have. I suppose I could fit it together so that the handle is skinner than the blade, but I do not like that type of design and after all, I want something steady and useful / usable knife. So the question, “What should I use for handle???”
Fortunately, I do have quite good mount of different types of wood corrected for this kind of needs, so started to dig in to my material box.
The first candidate came up was a bamboo. It is nice, but will end up being too thin handle. Also I did not quite like the light color. If it was smoked, then might have been real nice.
The second choice was a cherry. But this I do not have much and I have plan of using it for other project.
Then I realized that I just have split the oak log for axe helve. The grain is little boring, but is a very heard wood. This should be good enough for fiction folder.
Pick up the axe and shape it in brick shape, use template to draw the shape then whittle out the rough shape. File / sand it down to more close shape then slice it in 2 pieces.
I was thinking of making it in 1 piece handle, but since I am not putting the stopper pin, I need to make inside of the handle slit quite precise and complicated shape. To do that, I need to have it in 2 pieces handle.
I do not have the pictures of this process, but will putted on next post. Hope, the oak will please me when I am done.